VPN site-to-site connection in the IBM Cloud
Efficient and secure working from home? Using a VPN tunnel, it is now possible to work in the home office just like in the company.
Mobile working concepts have never been more in demand. In addition to the home office issue, the geographical location of internationally active companies is also a relevant topic. Companies often have branches in different locations. Due to this fact, a network between the national or even international branches of the company is particularly important to ensure the daily work. Thus, all employees must always be securely connected to the headquarters via a VPN site-to-site connection.
VPN site-to-site connection in the IBM Cloud
The IBM Cloud® is a public cloud for enterprises, but it also offers a next-generation hybrid multicloud platform. The IBM Cloud® allows local networks to be connected via site-to-site VPNs. Cross-site connectivity between different local client environments and IBM is enabled. (Source)
When does a VPN connection make sense? For an answer to this, see the past blog article in our VPN blog series.
Site-to-Site VPN Connection: IBM step-by-step guide
Similar as everyone else to create Site-to-site VPN connection, it should be defined steps for establishing:
Step 1: Already created Virtual Private Cloud (VPC) and resource group
Step 2: Create Virtual Private Gateway
Step 3: Create Virtual Private Network (VPN) connection for VPC
Step 4: Setup on-premise VPN device
Step 5: Specify Routing Table
Step 1: Create Virtual Private Gateway
- Under VPC Infrastructure on IBM Cloud Portal select VPNs under Network section and create new one as Site-to-site gateway
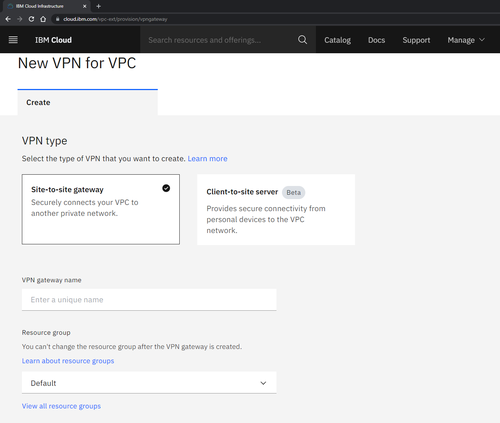
- Required information are name, resource group, region, VPC, subnet and work mode.
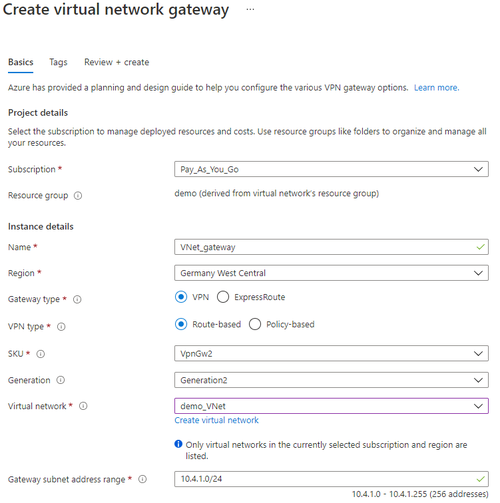
Step 2: Create VPN connection for VPC
- In continue of same page you can choose to create new VPN connection for VPC. Using this option you should give name, peer gateway address and Preshared key which will be defined from local on-premise. Dead peer detection can be as default configured and Policies on auto.
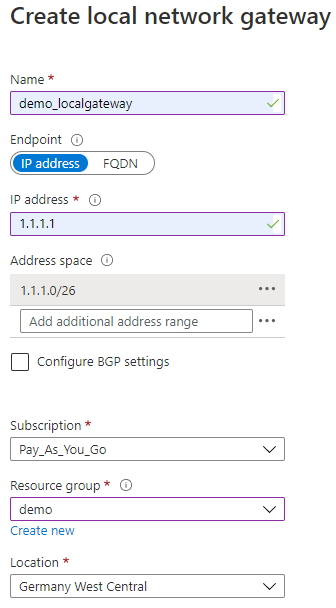
Step 3: Setup on-premise VPN device
- For Site-to-Site network connection, you also need to configure your on-premise VPN device.
- You need to set a shared key which you will use in the step 2 - creating Site-to-Site connection.
- You need to know the public IP address of your virtual network gateway. It can be found in the Overview tab of created VPN gateway.
- It is also possible to download existing VPN device configuration scripts depending on the device you have.
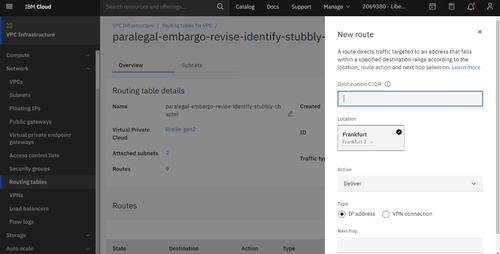
Step 4: Specify Routing table
- In the end, to make the connection with on-cloud VPN established, Routing table must be created and attached to VPC and subnets.
Our VPN Site-to-Site Connection blog series includes several posts. Learn how to set up your VPN connection with the cloud providers AWS and Microsoft Azure step-by-step in our next blog article.
Recommended articles
All blog articles