What you can do with "platform as a service" - Django on Beanstalk
"Platform as a Service" (PaaS) offers companies a powerful way to drive modern and cloud-based software development. The decisive factor here would be that companies are relieved of the responsibility for managing the underlying infrastructure (usually hardware and operating systems). The advantage here is particularly that developers can focus on deploying and maintaining applications. The Platform-as-a-Service model enables organizations to be more productive by not having to deal with resource acquisition, capacity planning, software maintenance, patching or other undifferentiated tasks associated with application operations. (source)
By the way, our blog post on Platform as a Service (PaaS) takes a closer look at the typical uses and benefits.
AWS Elastic Beanstalk
AWS Elastic Beanstalk is a simple platform as a service solution for deploying and scaling web applications and services written in Java, .NET, PHP, Node.js, Python, Ruby, Go, and Docker on well-known servers like Apache, Nginx, Passenger, and IIS. Simply upload your code, and Elastic Beanstalk will take care of everything else, including capacity provisioning, load balancing, auto-scaling, and application health monitoring. At the same time, you retain complete control over the AWS resources that power your application and may access them at any time.
Elastic Beanstalk is completely free of charge ; you just pay for the AWS resources you need in order to store and execute your application. (source)
Deploying a Django application to Elastic Beanstalk
This article shows how to deploy a default, autogenerated Django python website to an AWS Elastic Beanstalk Python cloud computing environment. This article demonstrates how to use an Elastic Beanstalk environment to host a Python web app in the cloud and to follow it, all of the common Python Prerequisites should be installed, including the following packages: Python 3.7 or later, pip, virtualenv and awsebcli. The Django python framework will be installed as part of this article.
General step-by-step instructions:
Step 1: Set up a Python virtual environment.
Step 2: Create a Django project
Step 3: Configuring the created Django application for Elastic Beanstalk.
Step 4: Using the Elastic Beanstalk CLI to set up the site.
Step 1: Setting up a Python virtual environment
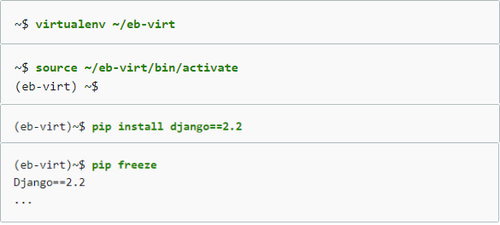
Using virtualenv command, create a virtual environment named eb-virt in which to install Django and its dependencies. You can know exactly which packages your application requires by utilizing a virtual environment, ensuring that the relevant packages are loaded onto the Amazon EC2 instances that are executing your application. The commands you have to input for Unix-based systems are shown on the image below, and Windows commands can be found at official AWS Developer Guide. (source)
Step 2: Creating a Django project
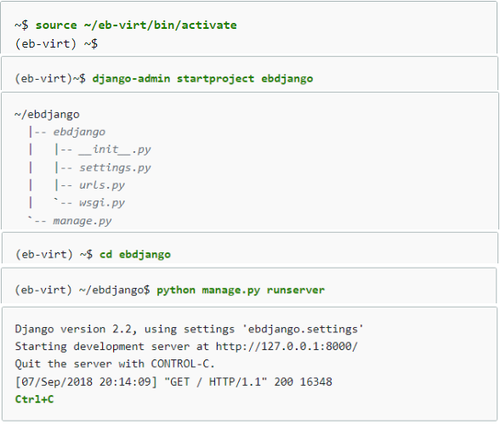
Now you're ready to build a Django python project and execute it into the cloud computing virtual environment onto your Personal computer. Firstly, you need to activate the virtual environment eb-virt, and then you can create a Django python project named ebdjango using the django-admin startproject command. With manage.py runserver you can start your Django site locally.
To see the site, open http://127.0.0.1:8000/in a web browser. To see the output of your request, look at the server log. Ctrl+C will shutdown the web server and bring you back to your virtual environment. (source)
Step 3: Configuring created Django application for Elastic Beanstalk
In order to launch your Django cloud application, Elastic Beanstalk looks for a file named application.py by default. Because this isn't present in your Django project, you'll have to make some changes to your application's environment. In order for your application's modules to be loaded, you must additionally set environment variables.
Run pip freeze and save the output to requirements.txt (EB uses it to determine which package to install on the EC2 instances that run your app). After that, create a directory named .ebextensions and add a configuration file named django.config (Example ~/ebdjango/.ebextensions/django.config, put text shown on the image below in that file) – EB uses it to start the application. (source)

Step 4: Using the Elastic Beanstalk CLI to set up the web site
To create an environment and deploy your Django application, you need to initialize your EB CLI repository with the eb init command (it creates django-tutorial application as shown in the image below). If you want to SSH to the EC2 instance, run eb init and follow the steps to configure a default key pair. With eb create you will create an environment and deploy your application to it (this command creates load-balanced EB environment named django-env). After the environment is created, find the domain name of your new environment using eb status command (value of CNAME property).

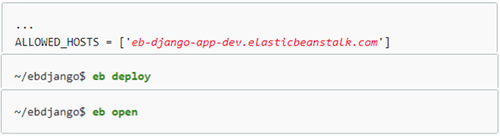
The next step is to locate ALLOWED_HOSTS in settings.py in the ebdjango directory, add your app’s domain name there and save it. Deploy your application using eb deploy command – EB CLI then bundles up the content of the project directory and deploy it to your environment. After the process is completed, open your website using eb open command. (source)
Congratulations, you’ve deployed your Django cloud app with Elastic Beanstalk using platform as a service model. What you can do next is updating and redeploying the app or its configuration, while EB does the rest of the work. After you’re done with this application, terminate your Elastic Beanstalk environment using eb terminate in order to conserve instance hours and other AWS resources between development sessions. (source)
Most cloud providers offer some form of Platform as a service (PaaS), making the above benefits available to any business. Other PaaS examples include Microsoft Azure App Services and Google App Engine. Learn more about them in upcoming blog articles.
Recommended articles
All blog articles